


Artisan Baking - My first artisan bread!
My Acme's Herb Slabs
European breads have long caught my attention. Coming from a Chinese background, none of my family has any fondness in these thick crusted breads. Instead, they prefer a softer rolls and buns, like brioche or the sweet Chinese buns. However, I find European breads beautiful and masterfully crafted. The crunchy crust with soft and smooth centre left a deep impression. That's why I turned to Maggie Glezer's Artisan Baking.
I have bought this book almost two months ago, but have been hesitating on initiating my first artisan bread due to lack of proper equipments and ingredients. Until now...
No, I haven't found the perfect tools nor ingredients. But, I've got fresh rosemary sprigs in my fridge and "Acme's Herb Slabs" is rolling into its creation...
One thing I need to notify you about this particular book of bread is how detailed the instructions are. As if you could never go wrong as long as you do the steps one by one. That made me amazed to see how talented Maggie Glezer really is. She pays attention to every little details and goes over the things where people normally make mistakes. For instance, she would warn you when not to add any more flour. As our novice hands are usually unable to resisit the temptation to add more flour when the dough is too sticky.
Without any more delay, I'd like to share with you the recipe that I made over the weekend. This recipe in total would take almost 23 hours from the very start til the very end. The reason why... you will find out within the recipe. Let the artisan bread baking begin!
Yield: 2 large flatbreads, just over 1 pound each
Time: About 23 hours, with 20 minutes of active work
Ingredients:
Poolish
- ¼ teaspoon instant yeast
- 1 cup water, 110° to 115°F
- 2 cups unbleached all-purpose flour, preferably organic
- 1½ cups water, lukewarm
Dough
- 3 cups unbleached all-purpose flour, preferably organic
- 1 Tablespoon plus ¼ teaspoon salt
- 1 Tablespoon plus 1 teaspoon fresh rosemary leaves, chopped
- ¼ teaspoon instant yeast
- ¾ cup water, lukewarm
- 2 Tablespoons olive oil
- Fermented poolish
Artisan Baking gives readers three different methods of working with the dough, by hand, by stand mixer and by food processor. We have included one of these methods: by hand. Getting your hands a little dirty in the process of baking bread always makes the end product taste that much better.
For the dough:
By hand, combine the flour, salt, rosemary and yeast in a large bowl. Add the water and oil to the poolish, stir to loosen it, and pour it all into the flour mixture. Stir the mixture with your hand until it forms a rough dough. Turn it out onto your work surface and knead it briefly, without adding extra flour, until it is well combined. Cover the dough with a bowl and let it rest for 10 minutes to allow the yeast to rehydrate. Knead the dough, without adding extra flour, until it is very smooth, about 10 minutes.
Fermenting and turning the dough:
Place the dough in a container at least 3 times its size and cover it tightly with plastic wrap. Let the dough ferment until light and doubled in bulk, about 6 hours. Turn the dough (punch the dough) 3 times in 20-minute intervals, that is, after 20, 40, and 60 minutes of fermenting, then leave the dough undisturbed for the remaining time.
Shaping and proofing the dough:
Cut the dough in half. Round the pieces and let rest for about 20 minutes. Lightly press one piece of the dough into a rectangle. Loosely fold it into thirds like a business letter by folding the bottom short edge up and the top down. Place it seam side down on a couche (see note) and cover it with a flap of the couche. Repeat with the other piece. Let them proof for about 1½ hours.
Cover a peel or rimless baking sheet with a large piece of parchment paper. Remove the dough from the couche and gently press each piece into a 12 x 6 inch rectangle with your hands (the workers in the bakery use a small wooden ruler to get the dimensions just so). Press your fingertips deeply into the dough to stipple it all over. Move the rectangles of dough to the parchment paper and resquare them. Cover them with plastic wrap and let proof until very soft and well expanded, about 2 hours more. The total proof time is about 3½ hours.
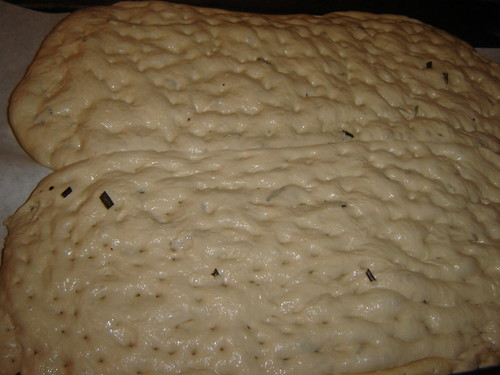
The dough after proofing
Expand.. expand... :)
Preheat the oven: About 45 minutes before the bread is fully proofed, arrange a rack on the ovens second-to-top shelf and place a baking stone on it. Clear away all racks above the one being used. Preheat the oven to 450°F.Expand.. expand... :)
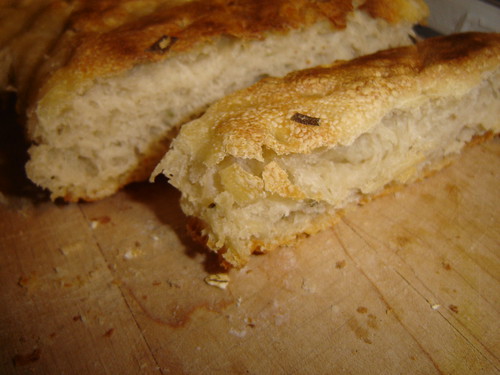
Poke the dough all over with a toothpick or a skewer, pushing all the way through. If desired, just before baking, fill the oven with steam. Slip the breads, still on the paper, onto the hot stone and bake for 5 minutes. Carefully flip the breads over onto the stone and remove the paper. Continue baking until they are well browned, about 20 minutes more, rotating them after 10 minutes. Let the breads cool on a rack.
Note: Couche, meaning "layer" in French, refers to the heavy-linen cloth used to support breads, such as rolls and baguettes, as they are proofing.
Endnote:
It has been a truly great experience making this particular bread. It was best eaten the same day after baking. However, I noticed something was wrong. There has been something murky about my RobinHood flour, it has this strange smell that I could not describe. It left me wondering, is it because the flour has aged or is it the smell of an unbleached flour. So, two days after baking, I can taste the very smell of flour in my bread. Unlike the first day when the fresh rosemaries permeated all over. Well, it's just my own confusion, and I shall find out more!
This flatbread, when cut will have a shape resembling a biscotti and will pair up nicely with garlic butter. Toasted, and ready to be served next to your pasta dishes ^^
Enjoy!
posted by little pomelo @ 1:05 AM
![]()
![]()
8 Comments:
its crispy! nice bread =p
What a lovely post! As to the flour being a bit off, I'm not sure--I know whole wheat flour can go off because of the oils it contains...not sure about unbleached. How old is it?
Oh-- and I posted a second follow up to your question re: bottles onto the vanillafication thread.
What beautiful bread, Ceendy! You've commented on your fondness for artisanal breads before, so I'm so pleased to read that you've taken this fondness into your own kitchen. Bravo!
I'm not sure about your flour dilemma. Perhaps next time you bake the bread, you could try it with a freshly-opened bag of flour, just to compare?
By the way, if you have the time, I've tagged you for a meme ... http://candiedquince.ca/archives/75
Aeons - Thank you!
Jasmine - I used the Original All-Purpose Robin Hood flour. Actually, I'm not too sure if it's bleached. I just assumed so because the color of the flour is not as white as baking powder. It's the 10kg one I bought in December last year.
Tania - I think I'm going to have to buy a fresh bag of flour. Do you have any recommendation for flour brand? Is there a store in Toronto that specializes on freshly-milled flour? Thank you for the tag! I'll find time to do that!
Tin - It is indeed very easy since it needs very little attention while fermenting and proofing :)
Congratulations, Ceendy!
Your bread looks terrific ... wish I could have some!
Ivonne - thank you!! Wish I could share too, but I'm afraid it doesn't taste as good as it looks right now :)
Thank you again for everyone who are even helping me solve my flour dilemma :)
Congratulations Ceendy...
You trully are a making of a 'Master Artisan Baker'. Your post is so well written. I've enjoyed it from start to finish.
Well done.
Post a Comment
<< Home